Seeing as I got myself some new bits and pieces the other week, and it is Sunday today which means day off, which means makeup experimenting; here's a tutorial for ya!


If you like this look, then keep reading to find out how I did it!


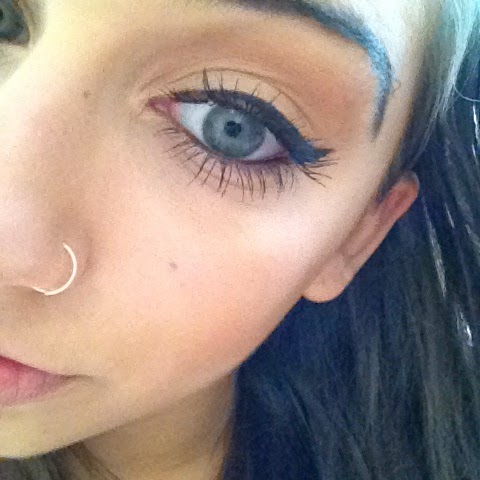
So I started by priming my eyes with, as always, the Urban Decay Primer Potion, then using the Sigma E40 Tapered Blending Brush, I applied the shade Naked from Urban Decay's Naked Palette into my crease, evenly distributing the colour from outer to inner corner.


Then with the Sigma E55 Eye Shading Brush, I patted the shade Buck (also from Naked) all over my lid.


Then with MAC's Red Brick Eyeshadow and a Sigma E25 Blending Brush, I blended this into my crease, focusing on the outer corner, and then bringing it in when there was less product on the brush. Just keep blending and blending until it looks how you want it to look. I blended a lot, at least for a song per eye!


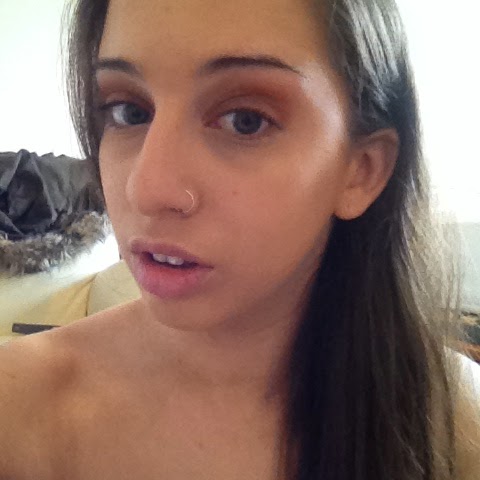
I then primed my T-zone with Benefit Porefessional, just with my finger tips, then with the Sigma F80 Flat Kabuki Brush I applied my gorgeous YSL Touche Eclat Foundation. I press the foundation into my skin with the brush, before blending it in in circular motions. Then using the Collection Lasting Perfection Concealer, I concealed my under eyes and nose creases, and highlighted my forehead, nose, chin and dimple areas (you can see in the photo). I think this concealer is really good for both concealing and highlighting.


I set my foundation and concealer with the Rimmel Stay Matte Powder in Transparent, then bronzed my cheeks, forehead and nose with this gorgeous matte Bourjois Bronzing Powder in 51 for a sun-kissed glow. I decided to just bronze my cheeks opposed to using blusher like normal because I didn't want anything to deter from the eyes, which are essentially the show-stoppers in this look, so it was neutral face for the win!


As always I filled in my eyebrows with the Rimmel Eyebrow Pencil in Black Brown and just used the little brush on the lid to blend it in nicely, then used the No7 Eyebrow Gel to help prevent my very long and fly away eyebrow hairs from going cray cray. Finally I highlighted my brow bone with the YSL Touche Eclat Radiant Touch.


Back to the eyes, I just used a Sigma E30 Pencil Brush to blend some more Red Brick under my lower lash line. Again, just keep blending until it looks how you like it!


I then applied a medium-ish line of Rimmel Exaggerate Eye Liner in Black, and of course with a wing. To make my eyes stand out that little bit more, MAC's Coffee Eye Pencil was essential, it just adds so much more to this look, and the coffee colour goes so well with the eyeshadow colours used. And then, of course, I applied two coats of Benefit 'They're Real' Mascara. If you've read a few of my tutorials, you've probably figured that I love dramatic bottom lashes, and would never apply anything less than two coats!


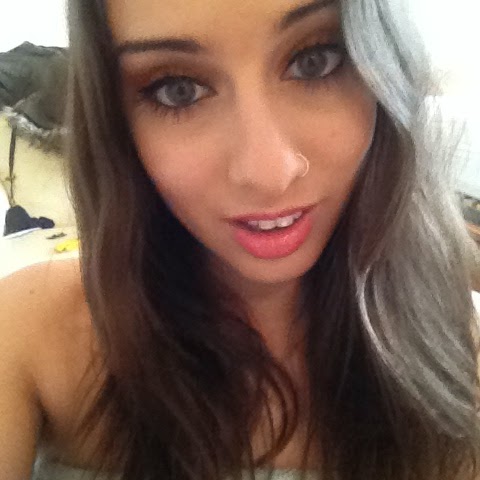
And as always we end with the lips. On a side note, it's always a good idea to put on some kind of lip balm before you start your makeup, so that when it comes to the lips they'll be nice and soft and moisturised. I'm using the Burt's Bees Beeswax Lip Balm at the moment! Anyway, similarly to the cheeks, I wanted a subtle lip, so opted for the MAC Mineralize Glass in Be Nice. It's such a beautiful neutral pink colour, and gloss is so in at the moment so can't really go wrong with this one!
And that's it! I hope you liked this look and everything is clear. Any questions, just holla at yo girl!


Dani Alexandra
Xoxo


If you like this look, then keep reading to find out how I did it!


So I started by priming my eyes with, as always, the Urban Decay Primer Potion, then using the Sigma E40 Tapered Blending Brush, I applied the shade Naked from Urban Decay's Naked Palette into my crease, evenly distributing the colour from outer to inner corner.


Then with the Sigma E55 Eye Shading Brush, I patted the shade Buck (also from Naked) all over my lid.


Then with MAC's Red Brick Eyeshadow and a Sigma E25 Blending Brush, I blended this into my crease, focusing on the outer corner, and then bringing it in when there was less product on the brush. Just keep blending and blending until it looks how you want it to look. I blended a lot, at least for a song per eye!


I then primed my T-zone with Benefit Porefessional, just with my finger tips, then with the Sigma F80 Flat Kabuki Brush I applied my gorgeous YSL Touche Eclat Foundation. I press the foundation into my skin with the brush, before blending it in in circular motions. Then using the Collection Lasting Perfection Concealer, I concealed my under eyes and nose creases, and highlighted my forehead, nose, chin and dimple areas (you can see in the photo). I think this concealer is really good for both concealing and highlighting.


I set my foundation and concealer with the Rimmel Stay Matte Powder in Transparent, then bronzed my cheeks, forehead and nose with this gorgeous matte Bourjois Bronzing Powder in 51 for a sun-kissed glow. I decided to just bronze my cheeks opposed to using blusher like normal because I didn't want anything to deter from the eyes, which are essentially the show-stoppers in this look, so it was neutral face for the win!


As always I filled in my eyebrows with the Rimmel Eyebrow Pencil in Black Brown and just used the little brush on the lid to blend it in nicely, then used the No7 Eyebrow Gel to help prevent my very long and fly away eyebrow hairs from going cray cray. Finally I highlighted my brow bone with the YSL Touche Eclat Radiant Touch.


Back to the eyes, I just used a Sigma E30 Pencil Brush to blend some more Red Brick under my lower lash line. Again, just keep blending until it looks how you like it!


I then applied a medium-ish line of Rimmel Exaggerate Eye Liner in Black, and of course with a wing. To make my eyes stand out that little bit more, MAC's Coffee Eye Pencil was essential, it just adds so much more to this look, and the coffee colour goes so well with the eyeshadow colours used. And then, of course, I applied two coats of Benefit 'They're Real' Mascara. If you've read a few of my tutorials, you've probably figured that I love dramatic bottom lashes, and would never apply anything less than two coats!


And as always we end with the lips. On a side note, it's always a good idea to put on some kind of lip balm before you start your makeup, so that when it comes to the lips they'll be nice and soft and moisturised. I'm using the Burt's Bees Beeswax Lip Balm at the moment! Anyway, similarly to the cheeks, I wanted a subtle lip, so opted for the MAC Mineralize Glass in Be Nice. It's such a beautiful neutral pink colour, and gloss is so in at the moment so can't really go wrong with this one!
And that's it! I hope you liked this look and everything is clear. Any questions, just holla at yo girl!


Dani Alexandra
Xoxo